
Simple Microscope: Diagram and Working Principle
 Introduction
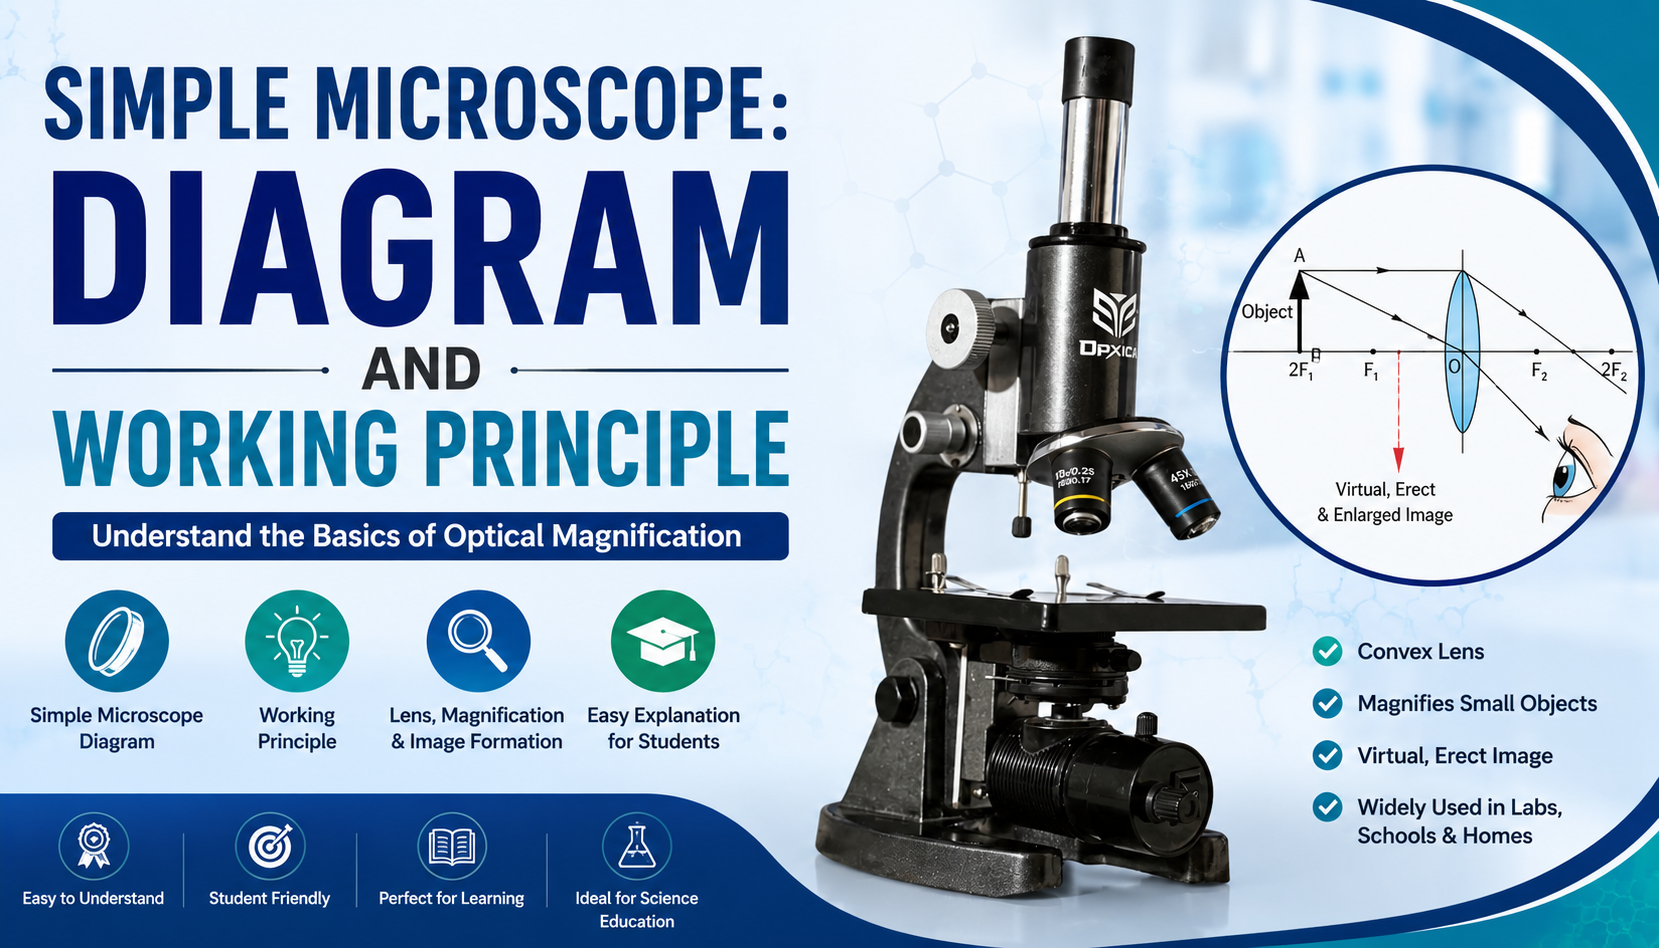
Tiny objects often contain fascinating details that cannot be seen with the naked eye. The fine structure of plant tissues, insect wings, textile fibers, printed circuits, and many everyday materials becomes visible only when they are magnified. One of the simplest optical instruments designed for this purpose is the simple microscope. Despite its basic construction, it has played a significant role in science, education, medicine, and industry for centuries.
What Is a Simple Microscope?
A simple microscope is an optical instrument that uses a single convex lens to produce an enlarged, virtual, and upright image of a small object. Unlike a compound microscope, which uses multiple lenses, a simple microscope relies on one lens to magnify objects. Because of its simple design, it is easy to operate, affordable, and ideal for beginners.
Why Is It Important?
The Simple Microscope: Diagram and Working Principle is an essential topic in biology and physics because it explains how light behaves when it passes through a convex lens. Students learn fundamental concepts such as refraction, focal length, magnification, and virtual image formation. These principles form the foundation for understanding more advanced optical instruments, including compound microscopes, telescopes, and cameras.
Where Is It Used?
Simple microscopes are widely used in:
- Biology laboratories
- Schools and colleges
- Medical education
- Jewellery inspection
- Watch repair
- Electronics
- Agriculture
- Printing and textile industries
- Scientific demonstrations
Their portability, ease of use, and low cost make them suitable for both educational and professional applications.
Magnifying Glass vs. Simple Microscope
Many people wonder whether a magnifying glass and a simple microscope are different. In reality, a magnifying glass is the most common example of a simple microscope. Both use a single convex lens to enlarge nearby objects. The term simple microscope is generally used in scientific education, while magnifying glass is commonly used in everyday life.
Learning what is simple microscope, its diagram, parts, and working principle provides students with a strong understanding of basic optics and prepares them for advanced studies in biology, physics, medical science, and laboratory technology.
Table of Contents
- What is Simple Microscope?
- History of the Simple Microscope
- Inventor of the Simple Microscope
- Importance of a Simple Microscope
- Why It Is Called an Optical Instrument
- Simple Microscope Diagram
- Parts of a Simple Microscope
- Construction of a Simple Microscope
- Simple Microscope Working Principle
- Ray Diagram of a Simple Microscope
- Magnification Formula
- Characteristics of the Image Formed
- Applications of a Simple Microscope
- Advantages of a Simple Microscope
- Limitations and Disadvantages
- Compound Microscope vs Simple Microscope
- Real-Life Examples
- Care and Maintenance
- Frequently Asked Questions
- Conclusion
What is Simple Microscope?
Quick Answer
A simple microscope is an optical device that uses a single convex lens to produce an enlarged, upright, and virtual image of a nearby object. It is widely used for observing small objects that are difficult to see with the naked eye.
Definition

A simple microscope is the simplest form of microscope. It consists of one convex lens mounted in a frame. When an object is placed within the focal length of the lens, the lens enlarges the object and creates a virtual image that appears much larger to the observer.
Unlike compound microscopes, which use multiple lenses to achieve very high magnification, a simple microscope depends on only one lens. Despite this simple design, it provides sufficient magnification for many educational, industrial, and laboratory applications.
The lens used in simple microscope is always a convex lens because this type of lens converges light rays and produces magnified images under suitable conditions.
Key Features
- Uses only one convex lens
- Produces a magnified image
- Forms a virtual image
- Image remains upright
- Lightweight and portable
- Easy to operate
- Low manufacturing cost
- Ideal for beginners
- Requires minimal maintenance
- Commonly used as an educational microscope
History of the Simple Microscope
Quick Answer
The simple microscope represents one of the earliest optical instruments developed to magnify small objects. It laid the foundation for the invention of modern microscopes and transformed the study of biology, medicine, and materials.
The history of magnification dates back thousands of years when polished crystals and curved pieces of glass were used to enlarge objects. However, scientific development accelerated during the late sixteenth and seventeenth centuries as lens-making techniques improved.
Early scientists recognized that carefully shaped convex lenses could enlarge tiny objects significantly. These discoveries eventually led to the creation of microscopes capable of revealing microscopic structures invisible to the naked eye.
The simple microscope played a major role in the birth of microbiology. It allowed researchers to observe insects, plant tissues, blood cells, and microorganisms with unprecedented clarity for that era.
Although today’s digital and research microscopes are far more advanced, the basic optical principles remain the same as those demonstrated by the simple microscope centuries ago.
Inventor of the Simple Microscope
Quick Answer
The development of the simple microscope is closely associated with Antonie van Leeuwenhoek, who crafted high-quality single-lens microscopes and used them to observe microscopic life.
Antonie van Leeuwenhoek is widely regarded as one of the pioneers of microscopy. During the seventeenth century, he designed powerful single-lens microscopes capable of magnifications that were remarkable for their time.
Using these instruments, he became one of the first scientists to observe:
- Bacteria
- Protozoa
- Blood cells
- Sperm cells
- Muscle fibers
- Microscopic aquatic organisms
His meticulous observations fundamentally changed biological science and established microscopy as an essential scientific discipline. While earlier lens makers contributed to the evolution of microscopes, Leeuwenhoek’s work demonstrated the extraordinary potential of carefully crafted single-lens instruments.
Importance of a Simple Microscope
Quick Answer
A simple microscope remains an essential educational and practical tool because it introduces the basic principles of magnification, optics, and image formation while enabling detailed observation of small objects.
Even in the era of digital imaging and high-resolution laboratory microscopes, the simple microscope continues to play a valuable role due to its simplicity, affordability, and effectiveness.
Its importance includes:
1. Builds the Foundation of Microscopy
Students first learn how lenses produce enlarged images through the study of a simple microscope. This knowledge prepares them for understanding compound, stereo, fluorescence, and electron microscopes.
2. Makes Small Objects Visible
Tiny structures such as seeds, insect parts, textile fibers, paper texture, and plant tissues become easier to examine.
3. Supports Biology Education
In biology laboratories, students use magnifying instruments to study leaves, flowers, insects, fungi, and small organisms before progressing to advanced microscopy.
4. Demonstrates Optical Principles
The simple microscope clearly illustrates important concepts including:
- Refraction
- Convex lens behavior
- Focal length
- Magnification
- Virtual image formation
- Light convergence
These concepts are central to both physics and life sciences.
5. Encourages Scientific Observation
Scientific learning begins with careful observation. By enlarging fine details, the simple microscope helps learners develop observation, comparison, and analytical skills.
6. Practical Everyday Applications
Beyond education, simple microscopes are valuable in jewellery inspection, watchmaking, electronics repair, printing, agriculture, and quality control, where small features need close examination.
Why Is a Simple Microscope Called an Optical Instrument?
Quick Answer
A simple microscope is called an optical instrument because it manipulates visible light using a convex lens to produce a magnified image without altering the object itself.
The instrument works by controlling the path of light through refraction. As light rays pass through the convex lens, they bend toward the optical axis and form an enlarged virtual image. This interaction between light and lens is the essence of optical science.
Because it depends entirely on the behavior of light rather than mechanical or electronic magnification, the simple microscope is one of the most fundamental examples of an optical device studied in physics, biology, and engineering.
Simple Microscope Diagram
Quick Answer
A simple microscope diagram shows the basic structure of a simple microscope, including the convex lens, frame, handle, object, eye position, and light path. Understanding the diagram helps students visualize how the instrument is constructed and how it forms a magnified image.

Suggested Labels:
- Convex Lens
- Lens Frame (Lens Holder)
- Handle
- Stand (Optional)
- Object/Specimen
- Principal Axis
- Incident Light Rays
- Refracted Light Rays
- Eye Position
- Virtual Image
Understanding the Diagram of a Simple Microscope
The diagram of a simple microscope is intentionally straightforward because the instrument contains only a few essential components. Each part has a specific role in producing a magnified image.
Unlike a compound microscope with multiple optical systems, a simple microscope relies on a single convex lens. This simplicity makes it one of the easiest optical instruments to understand and operate.
Below is an explanation of each label.
1. Convex Lens
The convex lens is the heart of the microscope.
It is thicker at the center and thinner at the edges. When light passes through the lens, it bends toward the optical axis. This bending of light is called refraction, which allows the microscope to enlarge nearby objects.
Without the convex lens, magnification would not occur.
Function
- Magnifies the object
- Converges light rays
- Produces a virtual image
- Provides clear viewing
2. Lens Frame
The lens frame securely holds the convex lens.
It keeps the lens fixed in the correct position and protects its edges from damage.
Modern lens frames are commonly made of:
- Plastic
- Brass
- Stainless steel
- Aluminum alloy
3. Handle
Many portable simple microscopes include a handle.
The handle allows users to hold the microscope comfortably while examining objects.
Its ergonomic design helps reduce hand movement, making observation more stable.
4. Stand
Some educational simple microscopes include a stand.
The stand provides stability when observing specimens for extended periods.
Benefits include:
- Reduced shaking
- Better focus
- Comfortable viewing
- Improved accuracy
5. Object (Specimen)
The specimen is the material being examined.
Examples include:
- Leaf sections
- Insects
- Textile fibers
- Printed paper
- Coins
- Stamps
- Small electronic components
- Seeds
- Hair strands
The object must be positioned within the focal length of the convex lens for proper magnification.
6. Eye Position
The observer looks through the convex lens.
Proper eye positioning helps achieve:
- Maximum brightness
- Sharp focus
- Comfortable observation
- Better image clarity
Keeping the eye close to the lens usually provides the widest field of view.
7. Light Rays
Natural or artificial light illuminates the object.
Light rays travel from the object toward the convex lens.
The lens bends these rays through refraction before they reach the eye.
8. Virtual Image
The enlarged image appears on the same side of the lens as the object.
This image is:
- Virtual
- Upright
- Enlarged
Because it is virtual, it cannot be projected onto a screen.
Simple Microscope of Diagram Explained
Students often search for the phrase simple microscope of diagram when looking for labelled illustrations.
A good labelled diagram should clearly indicate:
- Convex lens
- Lens holder
- Handle
- Object
- Light rays
- Eye position
- Virtual image
- Principal axis
Adding arrows showing the direction of light rays makes the diagram easier to understand during biology and physics classes.
Why Students Learn the Simple Microscope Diagram
Understanding the simple microscope diagram helps students:
- Identify every component correctly.
- Understand the flow of light.
- Learn the process of image formation.
- Prepare for laboratory practical examinations.
- Improve answers in board and university exams.
- Understand more advanced microscopes later.
A labelled diagram also strengthens conceptual learning by connecting theory with visual representation.
Parts of Simple Microscope
Quick Answer
The simple microscope parts include the convex lens, lens frame, handle, stand, object (specimen), eye position, and light source. Each part contributes to image formation, stability, and comfortable observation.
Main Parts of a Simple Microscope
1. Convex Lens
The convex lens is the most important component.
It acts as the optical element responsible for enlarging objects.
Characteristics include:
- Transparent optical glass
- Positive focal length
- High optical clarity
- Polished surfaces
- Precision curvature
The quality of the lens directly affects image sharpness.
2. Lens Holder (Frame)
The lens holder keeps the lens centered.
Functions include:
- Holding the lens firmly
- Preventing movement
- Protecting lens edges
- Maintaining optical alignment
A well-designed frame improves durability and viewing stability.
3. Handle
Portable simple microscopes often include a handle.
Its functions are:
- Comfortable grip
- Easy portability
- Stable observation
- Better control during inspection
Reading magnifiers and jeweller’s loupes commonly feature compact handles or foldable designs.
4. Stand
Educational models may include a stand that supports the lens above the specimen.
Advantages:
- Stable positioning
- Hands-free operation
- Reduced vibration
- Better precision
5. Object (Specimen)
The specimen is placed close to the convex lens.
Typical specimens include:
- Plant leaves
- Flower petals
- Feathers
- Insect wings
- Textile fibers
- Currency notes
- Printed documents
- Hair strands
- Small machine parts
The distance between the specimen and the lens determines image quality and magnification.
6. Eye Position
The observer’s eye acts as part of the optical system.
Correct positioning allows:
- Clear focus
- Wider viewing area
- Comfortable observation
- Reduced eye strain
7. Light Source
Although many simple microscopes do not include a built-in illuminator, sufficient external light is essential.
Common light sources include:
- Daylight
- LED lamps
- Laboratory illumination
- Desk lamps
Good lighting improves image brightness and visibility.
Summary Table: Parts of a Simple Microscope
| Part | Function |
|---|---|
| Convex Lens | Magnifies the object by refracting light |
| Lens Frame | Holds and protects the lens |
| Handle | Provides a secure grip for easy handling |
| Stand | Stabilizes the microscope during observation |
| Object (Specimen) | Item being examined |
| Eye Position | Allows direct viewing of the magnified image |
| Light Source | Illuminates the specimen for better visibility |
Construction of Simple Microscope
Quick Answer
The simple microscope construction consists of a single convex lens mounted in a sturdy frame. Its design is compact, lightweight, and optimized to produce enlarged virtual images through refraction of light.
Lens Used in Simple Microscope
The lens used in simple microscope is always a convex lens.
This lens is selected because it converges incoming light rays and provides magnification when the object is positioned inside its focal length.
A high-quality convex lens offers:
- Clear images
- Minimal distortion
- Better brightness
- Higher magnification
- Improved edge-to-edge sharpness
Material Used
Modern simple microscopes use high-quality materials for durability and optical performance.
Lens Material
- Optical crown glass
- High-grade acrylic
- Precision optical polymer (in some portable models)
Frame Material
- Brass
- Stainless steel
- Aluminum
- Engineering plastic
These materials ensure long service life while keeping the instrument lightweight.
Shape of the Lens
The lens is:
- Thicker at the center
- Thinner at the edges
- Symmetrically curved
- Carefully polished
This geometry enables the lens to bend light efficiently and create a magnified image.
Optical Arrangement
The optical arrangement of a simple microscope is extremely simple compared to advanced microscopes.
The basic sequence is:
Object → Convex Lens → Observer’s Eye
Since only one lens is used, there are fewer optical losses, making the instrument easy to understand and maintain.
Lens Thickness and Focal Length
Lens thickness and curvature determine the focal length.
In general:
- Greater curvature results in a shorter focal length.
- A shorter focal length provides higher magnification.
- Higher magnification requires more precise focusing and closer object placement.
The balance between focal length and image clarity is an important aspect of microscope design.
Frame Construction
The frame supports the lens and ensures proper alignment.
A well-constructed frame should provide:
- Mechanical strength
- Stable lens positioning
- Resistance to corrosion
- Comfortable handling
- Long-term durability
Portable magnifiers often use lightweight plastic or aluminum, while laboratory models may use metal frames for increased rigidity.
Simple Microscope Construction at a Glance
| Component | Description |
|---|---|
| Lens | Single convex lens with short focal length |
| Optical System | One-lens design |
| Frame | Holds and aligns the lens securely |
| Handle | Enables easy portability and use |
| Stand | Provides stability in educational models |
| Light Source | External illumination such as daylight or LED |
| Viewing Method | Direct observation through the convex lens |

Suggested Labels:
- Convex Lens
- Optical Axis
- Principal Focus (F)
- Center of Curvature
- Incident Light Rays
- Refracted Light Rays
- Object
- Virtual Image
Internal Linking Suggestions
To build topical authority and improve user navigation, consider linking this article to related guides such as:
- Compound Microscope: Diagram and Working Principle
- Parts of a Compound Microscope
- Types of Microscopes
- Convex Lens: Definition, Diagram and Uses
- Refraction of Light Explained
- Magnification Formula in Physics
- Microscope Care and Maintenance
Magnification Formula
Quick Answer
The magnification formula of a simple microscope explains how much larger an object appears when viewed through a convex lens. The magnifying power depends mainly on the focal length of the lens. A shorter focal length produces greater magnification.
What Is Magnification?
Magnification is the process of making a small object appear larger than its actual size. It does not increase the physical size of the object; instead, it enlarges the image seen by the human eye.
In a simple microscope, magnification is achieved using a single convex lens. When the object is placed within the focal length of the lens, the observer sees a larger, upright, and virtual image.
Example
A tiny insect wing that measures only 2 mm may appear several times larger through a simple microscope, allowing its fine details to be observed more clearly.
Magnifying Power of a Simple Microscope
Magnifying power (M) is the ratio of the angle subtended by the image at the eye to the angle subtended by the object when viewed without the microscope.
It indicates how many times larger an object appears compared to normal viewing.
Formula for Normal Adjustment
When the final image is formed at infinity (eye relaxed):
M=DfM = \frac{D}{f}
Where:
- M = Magnifying Power
- D = Least distance of distinct vision (25 cm)
- f = Focal length of the convex lens
Formula for Maximum Magnification
When the final image is formed at the least distance of distinct vision (25 cm):
M=1+DfM = 1 + \frac{D}{f}
Where:
- M = Magnifying Power
- D = 25 cm
- f = Focal length of the lens
This arrangement provides greater magnification because the eye views the image at its closest comfortable distance.
Understanding the Formula
The focal length of the convex lens determines magnification.
- Short focal length → Higher magnification
- Long focal length → Lower magnification
For example:
| Focal Length | Approximate Magnifying Power |
|---|---|
| 10 cm | 2.5× |
| 5 cm | 5× |
| 2.5 cm | 10× |
| 1.25 cm | 20× |
This is why jewellers and watchmakers often use lenses with very short focal lengths.
Derivation of the Magnifying Power Formula
Quick Answer
The magnifying power formula is derived by comparing the angular size of an object viewed through a simple microscope with the angular size of the same object viewed directly by the unaided eye.
Step 1: Normal Vision
The human eye sees objects comfortably at the least distance of distinct vision (D = 25 cm).
Let the object height be h.
The angle subtended by the object is approximately:
θ≈hD\theta \approx \frac{h}{D}
Step 2: Viewing Through the Microscope
When the object is placed within the focal length of the convex lens, the microscope forms an enlarged virtual image.
If the eye is relaxed and the image is at infinity:
θ′≈hf\theta’ \approx \frac{h}{f}
Step 3: Calculate Magnifying Power
Magnifying power is:
M=θ′θM=\frac{\theta’}{\theta}
Substituting the expressions:
M=h/fh/DM=\frac{h/f}{h/D}
The height cancels out:
M=DfM=\frac{D}{f}
Hence,
M=Df\boxed{M=\frac{D}{f}}
For the image formed at the least distance of distinct vision:
M=1+Df\boxed{M=1+\frac{D}{f}}
These equations form the basis of the simple microscope magnification formula taught in physics and biology.
Numerical Examples
Example 1
A simple microscope has a focal length of 5 cm.
Find its magnifying power when the final image is at infinity.
Solution
Given:
- D = 25 cm
- f = 5 cm
Formula:
M=255=5M=\frac{25}{5}=5
Answer: The microscope has a magnifying power of 5×.
Example 2
A convex lens has a focal length of 2.5 cm.
Find the maximum magnifying power.
Solution
Formula:
M=1+252.5M=1+\frac{25}{2.5} M=1+10M=1+10 M=11M=11
Answer: Maximum magnification = 11×
Example 3
A simple microscope provides a magnification of 10×.
Find the focal length.
Solution
Formula:
M=DfM=\frac{D}{f} 10=25f10=\frac{25}{f} f=2.5 cmf=2.5\text{ cm}
Answer: The focal length of the convex lens is 2.5 cm.
Example 4
A magnifying glass has a focal length of 12.5 cm.
Determine the magnification.
Solution
M=2512.5=2M=\frac{25}{12.5}=2
Answer: Magnification = 2×
Real-Life Understanding of Magnification
Magnification is easier to understand through everyday examples.
Reading Small Text
Reading glasses and handheld magnifiers enlarge tiny letters, making them easier to read.
Jewellery Inspection
Jewellers use high-quality convex lens microscopes to examine gemstones, identify surface imperfections, and inspect fine engravings.
Stamp and Coin Collection
Collectors use simple microscopes to study:
- Mint marks
- Fine printing
- Surface scratches
- Historical details
Electronics Repair
Technicians inspect:
- Solder joints
- Microchips
- Printed circuit boards
- Connectors
using compact magnifying microscopes.
Biology Education
Students observe:
- Leaf veins
- Flower parts
- Insects
- Seeds
- Small organisms
before progressing to compound microscopes.
Magnification Diagram
Suggested Labels:
- Convex Lens
- Object
- Focal Point (F)
- Optical Axis
- Human Eye
- Virtual Image
- Enlarged View
- Light Rays
Image Formation Diagram
Suggested Labels: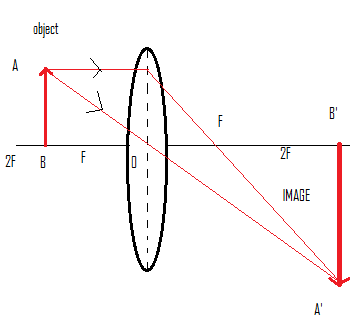
- Convex Lens
- Object
- Principal Axis
- Refracted Rays
- Backward Extension of Rays
- Virtual Image
- Observer’s Eye
Characteristics of the Image Formed
Quick Answer
A simple microscope forms a virtual, erect, enlarged image on the same side of the convex lens as the object. The image cannot be projected onto a screen because it exists only as an apparent image seen by the observer.
Characteristics of the Image
| Characteristic | Description |
|---|---|
| Nature of Image | Virtual |
| Orientation | Upright (Erect) |
| Size | Enlarged (Magnified) |
| Position | Same side of the lens as the object |
| Projection | Cannot be projected onto a screen |
| Visibility | Seen directly by the observer |
| Formation | Produced by refraction through a convex lens |
| Image Distance | Depends on object position and eye adjustment |
| Brightness | Depends on illumination and lens quality |
| Clarity | Depends on focal length, optical quality, and proper focusing |
Why Is the Image Virtual?
A virtual image forms because the refracted light rays diverge after passing through the convex lens. The human brain traces these rays backward, making them appear to originate from a point behind the lens. Since the rays do not actually meet, the image cannot be captured on a screen.
Why Is the Image Upright?
Unlike some optical systems that invert the image, a simple microscope keeps the object within the focal length of the convex lens. Under this condition, the image remains erect, making it easier to read text, inspect specimens, or perform detailed work.
Why Is the Image Enlarged?
The convex lens bends light rays so that the image subtends a larger angle at the eye than the object viewed directly. This increased angular size makes the object appear larger, even though its actual dimensions remain unchanged.
Factors Affecting Magnification
Several factors influence how effectively a simple microscope enlarges an object:
- Focal Length: Shorter focal lengths provide higher magnification.
- Lens Quality: Well-polished optical lenses reduce distortion and improve sharpness.
- Lighting: Adequate illumination enhances brightness and detail.
- Object Distance: The specimen must be placed within the focal length of the lens.
- Eye Position: Correct viewing distance ensures a clear and comfortable image.
Key Takeaways
- A simple microscope uses a single convex lens to magnify objects.
- Magnifying power is given by M=DfM = \frac{D}{f} or M=1+DfM = 1 + \frac{D}{f}, depending on image position.
- Shorter focal lengths result in greater magnification.
- The image formed is virtual, upright, enlarged, and located on the same side of the lens as the object.
- Proper illumination, accurate focusing, and high-quality optics are essential for achieving the best viewing experience.
Applications of Simple Microscope
Quick Answer
A simple microscope is widely used to observe small objects that are difficult to see with the naked eye. It is commonly used in biology laboratories, schools, medical education, jewellery inspection, electronics repair, printing, agriculture, textile industries, and scientific research.
Although a simple microscope uses only a single convex lens, it remains one of the most practical optical instruments for everyday inspection and educational purposes.
Why Is a Simple Microscope Used?
The primary purpose of a simple microscope is to enlarge the appearance of small objects. This enables users to observe fine details without the complexity of advanced microscopes.
Its compact design, affordability, and ease of use make it suitable for both beginners and professionals in various fields.
1. Biology Laboratories
One of the most common applications of a simple microscope is in biology laboratories.
Students use it to study:
- Leaf veins
- Flower petals
- Seeds
- Small insects
- Feathers
- Plant stems
- Moss
- Fungi
- Pollen grains (basic observation)
The microscope helps learners understand biological structures before moving to higher-magnification compound microscopes.
2. School Science Education
The simple microscope is an essential teaching aid in schools.
Teachers use it to demonstrate:
- Magnification
- Convex lens behavior
- Refraction of light
- Image formation
- Optical instruments
- Basic microscopy
It provides students with hands-on experience while learning physics and biology.
3. College Practical Laboratories
In colleges, students often begin microscope training with a simple microscope.
It helps them understand:
- Lens handling
- Proper focusing
- Working distance
- Image formation
- Optical principles
These practical skills prepare students for advanced laboratory equipment.
4. Medical Education
Medical students use simple magnifiers for preliminary observation of:
- Skin texture
- Nails
- Fine anatomical features
- Medical teaching models
- Diagnostic charts
Although detailed clinical examinations require advanced microscopes, simple microscopes remain useful for introductory learning and quick visual inspection.
5. Jewellery Inspection
Jewellers regularly use magnifying microscopes to inspect:
- Diamonds
- Gold ornaments
- Gemstones
- Hallmarks
- Engravings
- Surface scratches
- Stone settings
The enlarged image helps identify tiny imperfections that are invisible to the naked eye.
6. Watch Repair
Watchmakers use compact magnifiers while repairing delicate mechanical watches.
A simple microscope allows technicians to observe:
- Tiny gears
- Springs
- Screws
- Bearings
- Balance wheels
- Escapement mechanisms
Clear magnification improves repair precision and reduces errors.
7. Electronics and PCB Inspection
Electronics technicians inspect miniature components using simple microscopes.
Common observations include:
- Printed circuit boards (PCBs)
- Solder joints
- Connectors
- Integrated circuits
- Surface-mounted devices (SMDs)
- Broken tracks
Magnification makes troubleshooting and repair more accurate.
8. Printing Industry
Printing professionals examine:
- Ink distribution
- Printing dots
- Font quality
- Security features
- Alignment
- Surface defects
Simple microscopes assist in maintaining high print quality and identifying production defects.
9. Coin and Stamp Collection
Collectors use magnifying microscopes to study valuable collectibles.
Examples include:
- Mint marks
- Rare printing variations
- Surface wear
- Engravings
- Fine design details
- Authentication features
Magnification helps preserve and evaluate collectible items.
10. Textile Industry
Textile professionals inspect:
- Fabric weave
- Fiber thickness
- Yarn quality
- Thread count
- Surface defects
- Stitching accuracy
A simple microscope supports quality control during textile manufacturing.
11. Agriculture
Farmers, agricultural scientists, and students use simple microscopes to observe:
- Seeds
- Plant diseases
- Leaf damage
- Insect pests
- Crop samples
- Soil particles (basic inspection)
Early observation helps identify visible abnormalities before further laboratory testing.
12. Botanical Studies
Botany students examine:
- Leaves
- Flowers
- Fruits
- Plant hairs
- Root tips
- Seed structures
Magnification makes plant morphology easier to understand.
13. Zoological Studies
A simple microscope is useful for observing:
- Small insects
- Butterfly wings
- Feathers
- Animal hairs
- Shells
- Tiny organisms visible at low magnification
These observations introduce students to zoological classification and anatomy.
14. Reading Small Print
One of the oldest uses of the simple microscope is enlarging small text.
Reading magnifiers help people read:
- Newspapers
- Books
- Medicine labels
- Maps
- Legal documents
- Product instructions
This is particularly beneficial for elderly users and individuals with reduced vision.
15. Scientific Demonstrations
Teachers and science communicators use simple microscopes to explain:
- Refraction
- Convex lenses
- Magnification
- Virtual image formation
- Optical devices
- Human vision
Because the design is uncomplicated, it is ideal for classroom demonstrations.
16. Research and Field Studies
Researchers conducting fieldwork often carry portable magnifiers to inspect:
- Rock samples
- Soil particles
- Plant specimens
- Insects
- Fossils
- Environmental samples
Their portability makes them valuable for outdoor investigations.
Summary Table: Applications of Simple Microscope
| Field | Typical Use |
|---|---|
| Biology | Observing plant and insect structures |
| Schools | Teaching optics and microscopy |
| Colleges | Laboratory practical sessions |
| Medical Education | Preliminary observation and demonstrations |
| Jewellery | Gemstone and hallmark inspection |
| Watch Repair | Examining miniature watch components |
| Electronics | PCB and solder joint inspection |
| Printing | Print quality and security feature checks |
| Stamp & Coin Collecting | Studying fine details and authenticity |
| Textile Industry | Fiber and fabric inspection |
| Agriculture | Examining seeds, leaves, and pests |
| Botany | Plant morphology studies |
| Zoology | Observing small animal specimens |
| Reading | Enlarging books, labels, and maps |
| Research | Portable inspection during field studies |
Real-Life Examples of a Simple Microscope
Quick Answer
Many common tools used in daily life are examples of a simple microscope because they use a single convex lens to magnify objects.
1. Magnifying Glass
The most familiar example of a simple microscope is a magnifying glass.
It is commonly used for:
- Reading books
- Studying maps
- Inspecting coins
- Examining insects
- Viewing fine details
2. Jeweller’s Loupe
A jeweller’s loupe is a compact, high-quality magnifier used for inspecting:
- Diamonds
- Gemstones
- Gold ornaments
- Hallmarks
- Surface imperfections
It provides higher magnification than an ordinary magnifying glass.
3. Reading Lens
Reading lenses enlarge printed text, making newspapers, books, medicine labels, and documents easier to read.
They are widely used by individuals with age-related difficulty focusing on small print.
4. Pocket Magnifier
Pocket magnifiers are lightweight and portable.
Professionals carry them for:
- Field inspections
- Travel
- Outdoor observations
- Educational activities
5. Watchmaker’s Magnifier
Watchmakers wear small magnifiers close to one eye while repairing delicate mechanical watches.
These magnifiers help in examining tiny gears, screws, springs, and precision components.
6. Stamp Magnifier
Collectors use magnifiers to inspect:
- Rare stamps
- Printing errors
- Fine engravings
- Paper texture
- Authentication marks
7. Coin Inspection Lens
Numismatists use magnifiers to study:
- Mint marks
- Surface wear
- Historical engravings
- Counterfeit detection
8. Handheld Educational Microscope
Many classroom science kits include handheld simple microscopes for observing leaves, flowers, insects, and classroom specimens.
Advantages of Simple Microscope
Quick Answer
The advantages of a simple microscope include its low cost, portability, ease of use, and ability to provide clear magnified views of small objects. It is an excellent educational tool and a practical optical instrument for many inspection tasks.
1. Simple Construction
The microscope consists of only one convex lens, making it easy to understand and operate.
2. Easy to Use
Even beginners can quickly learn how to focus and observe specimens without extensive training.
3. Lightweight and Portable
Its compact design allows it to be carried easily for classroom activities, workshops, and field studies.
4. Affordable
Simple microscopes are significantly less expensive than compound or digital microscopes, making them accessible for schools and hobbyists.
5. No Electricity Required
Most simple microscopes rely on natural or external light, allowing them to be used anywhere without a power supply.
6. Clear Magnification
A high-quality convex lens provides a bright and enlarged image suitable for observing many everyday objects.
7. Low Maintenance
With only a few components, cleaning and maintenance are straightforward, reducing long-term costs.
8. Durable Design
Simple microscopes contain fewer mechanical parts, making them robust and less prone to damage.
9. Ideal for Learning Optics
They help students understand fundamental concepts such as refraction, focal length, magnification, and image formation before progressing to more advanced optical instruments.
10. Versatile Applications
A simple microscope can be used across diverse fields, including biology, medicine, jewellery, electronics, printing, agriculture, and education.
11. Immediate Observation
Objects can be viewed quickly without complicated setup or calibration, making the instrument convenient for routine inspections.
12. Encourages Scientific Curiosity
By revealing details invisible to the naked eye, a simple microscope inspires observation, experimentation, and interest in science among students and enthusiasts.
Summary: Advantages of a Simple Microscope
- Simple and user-friendly design
- Lightweight and portable
- Cost-effective
- Easy to maintain
- No electricity required
- Provides clear magnification
- Durable construction
- Ideal for educational use
- Supports practical learning
- Useful across multiple professions
- Quick to set up and use
- Promotes scientific observation and curiosity
Limitations / Disadvantages of Simple Microscope
Quick Answer
While a simple microscope is easy to use and affordable, it has several limitations. Because it uses only a single convex lens, it offers limited magnification and resolution compared to advanced microscopes. It is best suited for observing relatively larger specimens rather than microscopic cells or microorganisms.
1. Limited Magnification
A simple microscope provides lower magnification than a compound microscope.
It is suitable for enlarging small objects, but it cannot reveal extremely fine cellular structures or microscopic organisms in detail.
2. Lower Resolution
Resolution is the ability to distinguish two closely spaced points as separate.
Since a simple microscope has only one optical lens, its resolving power is limited compared to multi-lens microscope systems.
3. Not Suitable for Viewing Cells in Detail
Most animal cells, bacteria, and tissue sections require much higher magnification and better resolution.
A simple microscope is therefore not ideal for advanced biological studies.
4. Small Field of View
The viewing area is relatively small.
Large specimens often cannot be observed completely without moving the microscope or repositioning the object.
5. Requires Correct Lighting
Poor illumination results in dark or unclear images.
Users often need a good external light source for comfortable observation.
6. Short Working Distance
The object must be placed very close to the convex lens.
This leaves limited space for handling or manipulating specimens.
7. Limited Depth of Field
Only a small portion of the object remains sharply focused at one time.
Thicker specimens may appear partially blurred.
8. Lens Aberrations
Lower-quality convex lenses may produce:
- Edge distortion
- Color fringing (chromatic aberration)
- Spherical aberration
High-quality optical lenses reduce these effects but cannot eliminate them entirely.
9. Manual Focusing
Simple microscopes generally lack precision focusing mechanisms.
The user must manually adjust the distance between the object and the lens to obtain a clear image.
10. No Built-In Illumination
Many simple microscopes rely on natural light or an external lamp.
Without adequate lighting, image quality decreases significantly.
11. Unsuitable for Advanced Research
Modern scientific research often requires:
- High magnification
- Digital imaging
- Measurement capabilities
- Fluorescence techniques
- High-resolution optics
A simple microscope cannot perform these specialized tasks.
12. No Image Capture Facility
Traditional simple microscopes do not include cameras or digital imaging systems.
Users cannot easily save, measure, or share observations without additional accessories.
Summary: Disadvantages of a Simple Microscope
- Limited magnification
- Lower resolving power
- Small viewing area
- Requires good lighting
- Short working distance
- Limited depth of field
- Manual focusing
- Optical aberrations
- No built-in illumination
- Unsuitable for advanced research
- Cannot observe very fine cellular details
- No integrated digital imaging
Difference Between Simple Microscope and Compound Microscope
Quick Answer
A simple microscope uses a single convex lens to produce a magnified image, whereas a compound microscope uses two or more lens systems (objective and eyepiece lenses) to achieve much higher magnification and resolution. Compound microscopes are designed for detailed laboratory and research applications.
Comparison Table: Simple Microscope vs Compound Microscope
| Feature | Simple Microscope | Compound Microscope |
|---|---|---|
| Number of Lenses | Single convex lens | Objective lens and eyepiece lens |
| Magnification | Low to moderate | High to very high |
| Resolution | Lower | Higher |
| Image Quality | Basic magnified view | Sharper and more detailed |
| Construction | Simple | More complex |
| Cost | Affordable | More expensive |
| Portability | Highly portable | Less portable |
| Weight | Lightweight | Heavier |
| Illumination | External light | Built-in illumination system |
| Focusing | Manual positioning | Coarse and fine focus controls |
| Field of View | Smaller | Larger and clearer |
| Typical Uses | Reading, jewellery, education | Biology, pathology, microbiology, medicine |
| Maintenance | Easy | Requires regular maintenance |
| Suitable Users | Beginners and students | Researchers and laboratory professionals |
| Specimens | Larger visible objects | Cells, tissues, microorganisms |
| Image Detail | Moderate | Excellent |
| Practical Applications | Everyday inspection | Scientific diagnosis and research |
| Power Requirement | Usually none | Often requires electricity |
| Working Principle | Single convex lens | Multiple lens system with higher optical correction |
| Typical Example | Magnifying glass | Laboratory compound microscope |
Which Microscope Should You Choose?
The choice depends on your purpose.
Choose a simple microscope if you need:
- A portable magnifying device
- Reading assistance
- Jewellery inspection
- Educational demonstrations
- Basic laboratory observations
Choose a compound microscope if you need:
- High magnification
- Cell observation
- Tissue examination
- Medical laboratory work
- Microbiology studies
- Research-grade imaging
Care and Maintenance of a Simple Microscope
Quick Answer
Proper care and maintenance help preserve the optical quality, durability, and performance of a simple microscope. Regular cleaning and correct storage can significantly extend its service life.
1. Clean the Lens Carefully
The convex lens is the most important part of the microscope.
Always clean it using:
- Lens cleaning paper
- Microfiber cloth
- Approved lens cleaning solution
Avoid using rough fabrics, tissue paper, or clothing, as they can scratch the optical surface.
2. Remove Dust Regularly
Dust particles reduce image clarity.
Use:
- Air blower
- Soft lens brush
- Dry microfiber cloth
Never wipe dusty lenses without first removing loose particles.
3. Avoid Touching the Lens Surface
Fingerprints leave oils that reduce image quality and may damage optical coatings over time.
Handle the microscope by its frame or handle instead of touching the lens.
4. Store in a Dry Place
Moisture can encourage fungal growth on optical glass and may corrode metal parts.
Store the microscope:
- In a dry cabinet
- Inside a protective case
- Away from excessive humidity
5. Protect from Direct Sunlight
Continuous exposure to sunlight may damage plastic components and affect optical materials.
Keep the microscope in a cool, shaded environment when not in use.
6. Handle with Care
Although simple microscopes are durable, dropping the instrument can crack the lens or misalign the frame.
Always place it on a stable surface after use.
7. Keep Away from Chemicals
Strong acids, solvents, and cleaning chemicals may damage the lens coating or frame materials.
Use only recommended optical cleaning products.
8. Inspect Before Use
Before each observation session:
- Check for dust on the lens.
- Ensure the frame is secure.
- Verify that the lens is free from scratches or cracks.
- Confirm adequate lighting.
Routine inspection helps maintain consistent image quality.
9. Use Proper Lighting
Bright, even illumination improves image clarity.
Avoid excessively bright light that may cause glare or eye strain.
Natural daylight or a soft LED lamp often provides excellent illumination.
10. Cover When Not in Use
A dust cover helps protect the microscope from:
- Dust
- Moisture
- Accidental scratches
- Environmental contaminants
This simple practice extends the lifespan of the instrument.
Best Practices Checklist
| Maintenance Task | Recommendation |
|---|---|
| Lens Cleaning | Use lens paper or microfiber cloth only |
| Dust Removal | Air blower or soft brush |
| Storage | Dry, dust-free cabinet or protective case |
| Lens Handling | Avoid touching optical surfaces |
| Sunlight | Store away from direct sunlight |
| Chemicals | Use approved optical cleaners only |
| Inspection | Check lens and frame before use |
| Lighting | Use adequate natural or LED light |
| Protection | Keep covered when not in use |
| Transportation | Carry carefully to prevent damage |
Key Takeaways
- A simple microscope is an excellent optical instrument for education, inspection, and everyday magnification tasks, but it has limitations in magnification and resolution.
- Compared with a compound microscope, it is simpler, more portable, and easier to maintain, making it ideal for beginners and routine observations.
- Regular cleaning, proper storage, careful handling, and suitable lighting help ensure clear images and a longer service life.
Frequently Asked Questions (FAQ)
1. What is a simple microscope?
A simple microscope is an optical instrument that uses a single convex lens to produce a magnified, upright, and virtual image of a small object. It is commonly used in schools, laboratories, jewellery inspection, watch repair, and reading small print.
2. What is the working principle of a simple microscope?
The simple microscope working principle is based on the refraction of light through a convex lens. When an object is placed within the focal length of the lens, the lens forms a magnified virtual image that appears larger to the observer.
3. Which lens is used in a simple microscope?
A convex lens is used in a simple microscope because it converges light rays and produces an enlarged image of the object.
4. Who invented the simple microscope?
The simple microscope is closely associated with Antonie van Leeuwenhoek, who designed powerful single-lens microscopes and used them to observe microorganisms during the 17th century.
5. What image is formed by a simple microscope?
A simple microscope forms an image that is:
- Virtual
- Upright (Erect)
- Enlarged (Magnified)
- Located on the same side of the lens as the object
6. What is magnification in a simple microscope?
Magnification is the process of making a small object appear larger than its actual size. It depends mainly on the focal length of the convex lens.
7. What is the magnification formula of a simple microscope?
For normal adjustment:
M=DfM=\frac{D}{f}
For maximum magnification:
M=1+DfM=1+\frac{D}{f}
Where:
- M = Magnifying Power
- D = Least distance of distinct vision (25 cm)
- f = Focal length of the convex lens
8. What are the main parts of a simple microscope?
The basic parts include:
- Convex lens
- Lens frame
- Handle
- Stand (in some models)
- Object (specimen)
- Eye position
- Light source
9. Why is a convex lens used in a simple microscope?
A convex lens bends incoming light rays toward a common point, allowing the observer to see a magnified virtual image.
10. What are the applications of a simple microscope?
A simple microscope is used in:
- Biology laboratories
- Schools
- Colleges
- Medical education
- Jewellery inspection
- Watch repair
- Electronics
- Agriculture
- Printing
- Textile industry
- Research
- Reading small print
11. What are the advantages of a simple microscope?
Major advantages include:
- Easy to use
- Portable
- Affordable
- Lightweight
- Low maintenance
- Clear magnification
- No electricity required
- Suitable for beginners
12. What are the disadvantages of a simple microscope?
Some limitations are:
- Limited magnification
- Lower resolution
- Small field of view
- Manual focusing
- No built-in illumination
- Unsuitable for advanced research
13. Can a simple microscope observe bacteria?
Generally, no. Most bacteria require the higher magnification and resolution of a compound microscope for clear observation.
14. What is the difference between a simple microscope and a compound microscope?
A simple microscope uses one convex lens for low magnification, while a compound microscope uses multiple lenses to achieve much higher magnification and better resolution for observing cells and microorganisms.
15. Is a magnifying glass a simple microscope?
Yes. A magnifying glass is one of the most common examples of a simple microscope because it uses a single convex lens to enlarge nearby objects.
16. What is the least distance of distinct vision?
The least distance of distinct vision is the closest distance at which a normal human eye can see an object clearly without strain. It is conventionally taken as 25 cm.
17. Why does a simple microscope form a virtual image?
The refracted light rays diverge after passing through the convex lens. The eye traces these rays backward, creating the perception of an enlarged virtual image.
18. Where is a simple microscope used in daily life?
Common daily-life applications include:
- Reading newspapers
- Inspecting jewellery
- Examining coins and stamps
- Repairing watches
- Electronics inspection
- Educational demonstrations
19. How should a simple microscope be maintained?
To maintain a simple microscope:
- Clean the lens with lens paper or a microfiber cloth.
- Store it in a dry, dust-free place.
- Avoid touching the optical surface.
- Protect it from moisture and direct sunlight.
20. Why do students study the simple microscope?
Students learn about the simple microscope to understand:
- Refraction of light
- Convex lenses
- Magnification
- Image formation
- Optical instruments
- Basic principles of microscopy before studying advanced microscopes.
In a Nutshell
The Simple Microscope: Diagram and Working Principle is a fundamental topic in physics and biology that explains how a single convex lens produces a magnified, virtual, and upright image. Understanding what is simple microscope, its parts, construction, simple microscope working principle, magnification, and image formation helps students build a strong foundation in optics and microscopy.
Although a simple microscope provides lower magnification than a compound microscope, it remains an important tool for schools, biology laboratories, jewellery inspection, watch repair, electronics, agriculture, and many other practical applications. Its simple design, portability, affordability, and ease of use make it ideal for beginners and professionals alike.
By learning the simple microscope diagram, working principle, and applications, students gain essential knowledge that prepares them for advanced optical instruments and scientific studies in biology, physics, medicine, and laboratory technology.

3 comments on “Simple Microscope: Diagram and Working Principle”